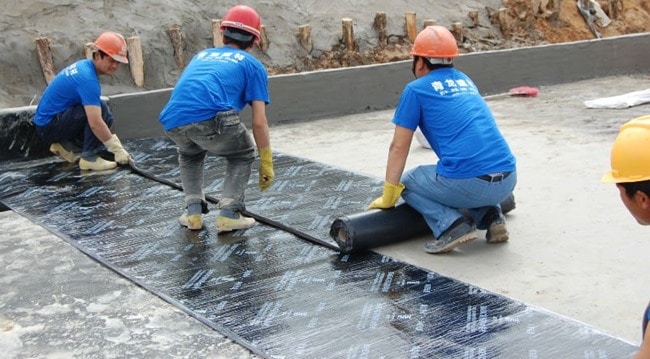
Roof Waterproofing Using Bituminous Waterproofing Membrane Sheet
A bituminous waterproofing membrane is used for reinforced concrete roof waterproofing. This waterproofing membrane comes on site in the form of rolls manufactures and packed in the factory properly sealed.
The specifications and safety manuals of this membranes provided by manufacturer should be read before installation process. Fire safety and prevention is the most important while using this membrane.
All inflammable materials from roofs to be removed and good roofing practices should be followed.
The bituminous waterproofing membranes are unfolded on the site and laid firmly on surface with tar based adhesives using blowtorches.

A layer of bituminous water proof membrane is laid over the structural roof which acts as a shield against the seepage of water onto the roof. Roof tiles & membrane is applied over the filler material laid to slope to pass the flow of water into drains. A proper slope is necessary to allow the water to flow steadily to drains.
These membranes have 2 to 4 mm thick water proof materials. Membrane should be flexible with elongation 150 % to cover any small cracks, strong, chemical & UV resistant, flexible enough to take any shape over which it is laid.
Procedure for Roof Waterproofing Using Bituminous Waterproofing Membrane

Roof Surface Preparation
The surface to be membrane should be clear from dirt, dry and clean. Must not be installed during adverse weather and below 450 F. For slope up to 3 inch the membrane should be laid perpendicular to slab and more than 3 inch slope should be laid parallel to slope. This ensures that water is never be running at joint lap edge.
Torch Equipment
Torch equipments should be properly connected and hoses to be in good working condition. Check the equipment against gas leakage by using soapy water. When torch is opened it should be at lowest possible settings to avoid sudden gush of fire.
Roll Alignment
No wrinkles should be allowed while laying membrane and proper alignment is necessary.
Bituminous Waterproofing Membrane installation
The torch fire should be applied uniformly and slow over the roll while laying. The best movement of the torch is as shown in the picture.
Compound flow out
While torching membrane on joints, approximately 1-inch chemical from the waterproofing membrane should be flowing out to ensure proper filling of gaps. More than 1-inch flow out signals to overheating of membrane.
Roller should be laid over joints along with torching so that compound sets properly and no gap is created in joints.
Check Joints between Waterproofing Sheets
Ensure perfect joint between two sheets is the most crucial part. Check all the edges of joints properly to ensure proper adhesion of end laps of membrane, air gaps is not acceptable. At gaps the sheets should be lifted and heated with the torch and resealed again.
End Laps in Waterproofing Membrane Sheets
At the end of sheet should be heated properly as to bitumen starts appearing over the sheet. Heat the underside of membrane properly to ensure proper bond at laps.
The bituminous waterproofing membrane sheets are overlapped 3 inches at the sides and 6 inches at the ends for proper grip and waterproof joint and block water seepage. Staggered end laps must be 18 inches apart so that no adjacent end laps coincide
Granules Applications
Granules applications matching the sheet at the end laps and roller is spread to set it properly. This all applications will give roof an enhanced professional finish.

It is very useful post
ReplyDeleteHI, if you want about more details click my website link
https://civilengineerstechnicals.world/