Thursday, June 14, 2018

Methods of Bridge Column Casing -Properties, Details and Uses


The purpose of providing bridge column casing is to improve ductility, shear and flexural capacity of the column and occasionally restricting bridge column radial dilating strain at plastic hinge areas.
There are different methods employed for bridge column casing such as steel casing, concrete casing, fiber reinforced plastic composite casing, and wire wrap casing.
Methods of Bridge Column Casing

Methods of Bridge Column Casing

  • Steel casing
  • Bridge concrete column casing
  • Fiber reinforced plastic composite casings
  • Wire wrap casings

Steel Casing of Bridge Columns

Generally, there are three classes of steel casing which is being practiced and used to improve seismic performance of bridge columns. The first type termed as class F type of column casing is completely grouted and it covers up the entire height of the column.
Not only does it utilized to enhance flexural capacity of the column but also improves shear capacity. Therefore, it is suitable for column with shear and flexural deficiency.
It almost completely prevents slippage of column lap splice and decline radial dilating strain to less than 0.001.
So important is the class F steel casing that increase confinement and improve shear strength considerably. Figure-1 and Figure-2 show detailing and execution of Class F type of steel casing of bridge column.
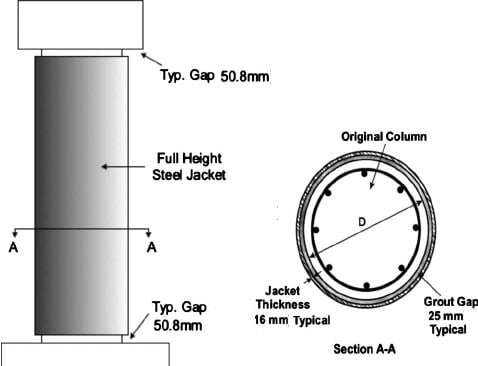
Detail of Class F Type of Column Casing

Fig.1: Detail of Class F Type of Column Casing
Steel Casing of Bridge Columns
Fig.2: Bridge Column Steel Casing
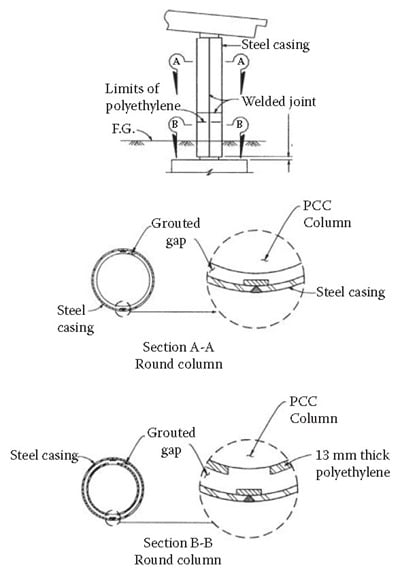
As far as the partial height column casing is concerned, it is the second category of column casing that covers part of column height. The main difference between class F and class P type is a layer of polyethylene which is not provided in the former type as it is shown in Figure-3.
It should be bore in mind that, this class of steel casing is not suitable for improving shear capacity of the member. Added to that, the class P type allows dilating strain greater than 0.001 and a pin would be created at the base of the column.
It is allowed to extended partial casing to the full height of the column for aesthetic purposes in locations where the column is highly visible.
Details of Class P Type of Bridge Column Steel Casing
Fig.3: Details of Class P Type of Bridge Column Steel Casing
Application of Class P Type of Column Casing
Fig.4: Application of Class P Type of Column Casing
The third class of the column bridge steel casing is composed of the combination of the two aforementioned classes. The third class of bridge casing can be employed to improve column that does not have adequate shear strength. The details of third class steel casing is provided in Figure-5.
Details of Third Class Bridge Column Casing
Fig.5: Details of Third Class Bridge Column Casing

Bridge Concrete Column Casing

Concrete casing of bridge column is considered to be a suitable option when the column shape is not common and it needs to be maintained after the retrofit for aesthetic purposes.
The requirements of new column design are employed for the design of bridge column jacking. Not only does this method increase flexural capacity of the bridge column but also enhance its shear strength in addition to improve column confinement.
The practical work includes the placement stirrups or hoop reinforcement around the column followed by drilling and bonding bars into the column as it can be seen from Figure-6.
Finally, concrete will be placed and the aesthetic appearance of the column will be maintained. It should be remembered that the practical works is messy and could be costly.
Placing and Bonding of Reinforcement Bars around Concrete Column
Fig.6: Placing and Bonding of Reinforcement Bars around Concrete Column

Fiber Reinforced Plastic Composite Casings of Columns

This method can be used to increase shear capacity and confinement of bridge column. it could be an economic approach for enhancing bridge column apart from the cases where the restriction the of lap splice slippage inside the anticipated plastic hinge areas is needed.
Fiber reinforced plastic composite is flexible and can be wrapped around bridge column which means the original shape of the column would be maintained. This is especially significant when the aesthetic appeal of the element is intended to be kept.
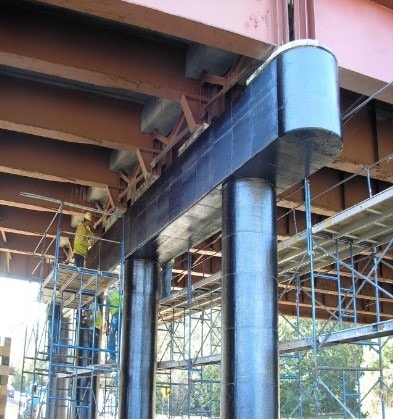
Bride Column Casing using Fiber Reinforced Plastic Composite
Fig.7: Bride Column Casing using Fiber Reinforced Plastic Composite

Wire Wrap Casings of Bridge Columns

This technique includes hand wrapping of prestressing strands onto the column and placing wedges between strand column interface. This system can be employed to various column shapes similar to fiber reinforced plastic composite casing.
It should be mentioned that, the wire wrap technique need extensive labor work to execute and it currently adopted for circular columns.

Tuesday, June 12, 2018

What is Raised Floor System? Its Advantages and Applications


What is raised floor system?

Elevated floor system, which is also termed as access floor system, is a raised structural floor that is placed on a reinforced concrete slab.
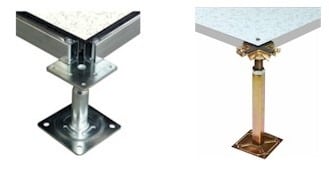
The elevated floor system consists of a several panels, as shown in Figure-1, which are installed on vertical adjustable pedestals as it can be noticed in Figure-2. The pedestals are fixed on the concrete slab using suitable means for instance adhesives or mechanical fixings.
Moreover, the gap between the elevated floor system and reinforced concrete slab below can be varied and ranges from 7.62cm (3inches) to 121.92cm (48inches) because the pedestals are adjustable.
Furthermore, the panel of raised floor system is composed of cement or wood core clad in steel or aluminum and its size is 60.96cm by 60.96cm. Finally, the panels are compatible with several flooring finishes for example vinyl, linoleum, laminate, rubber, carpet and stone or ceramic tiles.
Panel of Raised Floor System
Fig.1: Panel of Raised Floor System with their Adjustable Pedestals
Raised Floor System Adjustable Pedestal
Fig.2: Adjustable pedestals used to support panels of raised floor system; Bolted Stringer (left) and Stringerless corner Lock

Areas Typically Most Suitable for Raised Floor Systems

  • Computer rooms and other information technology spaces.
  • General open office areas.
  • Training and conference areas.
  • Exhibit spaces.
  • Support spaces for offices, including electrical closets, fan rooms, etc.
  • Clean rooms
Raised Floor Systems Applications

Areas Not Suitable for Raised Floor Systems

Slab on Grade Locations

Raised floor system is not suitable to be placed directly on the slab on grade. This is because protection against heat, contaminant, and moisture that transferred with soil, soil gas, and ground water cannot be achieved for long period.

Toilets, Showers, Baths, Dishwashing and Other Wet Area

Plumbing fixtures are commonly installed in these areas which may leak and lead to the corrosion and deterioration panels.

Kitchen and Food Preparation Areas

High humidity and possible spillage food and liquids and seepage make these areas inappropriate for such types of floor system.

Laboratories

The likelihood of chemical and biological spills in addition to moisture and presence of plumbing make laboratory unsuitable for raised floor system.

Fire Stairs

Stair landings need interface with any adjacent raised floors as a flush condition with the edge of the access floor well supported.

Mechanical Equipment Rooms

Examples of such rooms involve air handling equipment, chiller, and boiler. it can be noticed from their names that these room have conditions in which panels of raised floor system will deteriorate and damage.
Other areas include Central storage rooms and loading areas, trash roomsUPS, emergency generator, and similar rooms, and Child care.

Advantages of Raised Floor System

  • This type of floor system tackles the problem of shear transfer across the diaphragm
  • Raised floor system are waterproofed
  • It leads to reduction in the cost of construction in high seismic regions
  • Raised floor system could serve as a high thermal mass base material for radiant heat systems which are distributed by hot air or hot water. So, Heating and cooling a building with a raised flooring system is more efficient
  • The concrete surface can be finished as a final floor finish as desired by sealing, polishing, stamping, or staining. Consequently, the extra cost of covering used for covering floors will no longer be needed
  • Acoustic isolation is another advantages offered by raised floor system.
  • In high wind threat areas, elevated floor system will improve the lateral resistance and durability of multistory building especially when it combined with concrete roof system
  • Fire is suppressed from floor to floor

Structural Conditions Requirements of Raised Floor System

There are several structural conditions that raised floor system need to be met the following minimum conditions otherwise it will not be utilized unless it is specified in building specifications.
  • It should be able to support 11.86KN/m2
  • It is required to carry point load of 4KN
  • Raised floor system need to withstand a minimum impact load of 2.25KN
  • It should resist rolling load (1 wheel) of 2KN at 1000 passes and
Seismic Conditions Requirements of Raised Floor System
The specified raised floor system need to comply the following conditions (as minimum):
  • For seismic zone 3 and higher seismic zones, it is required to use bolts for fixing pedestals. Commonly, manufacture specifies the suitability of pedestal for seismic zones.
  • It is required to use bracing for pedestals provided that their length is greater than 30.48cm and used in seismic zone 3 and greater.
Acoustic and Vibration Considerations During Design and Construction of Raised Floor System
Impact sounds on floor panels generated by walking or rolling load may necessitate damping of panels with cushions on pedestals. Hollow panels do not show proper performance in this regard whereas panels with light concrete, cementitious materials, or wood will perform satisfactorily.
Transmission of sounds under the floor from one space to another might occur. In this case, the provision of sound transmission attenuation will be required of partition system.
Vibration transmission is not dealt with neither by manufacturer nor design criteria to attenuate vibration such as from machinery, transformers or other sources. So, specialist should be called to tackle such problem.


Monday, June 11, 2018

Standard Size of Rooms in Residential Building and their Locations


Knowledge of standard size of rooms and their location in a residential building is important for planning of residential construction project. The room sizes and their location provides spaces for movement, sunlight and natural air for residents.

Standard Size of Rooms in Residential Building and their Locations

1. Size of Drawing or Living Room:

Drawing room or living room is a common, comfortable and attractive place for sitting of family members and to receive friends and guests. Sometime it is used as reception room and dining room and special occasions.
Drawing room should be located in the middle of the building and should be connected to the front verandah and dining place. It should be well-lighted and ventilated.
Standard Size of Rooms in Residential Building
Generally, drawing or living room is the biggest room of the building so that it can be utilized for some ceremonial function in the house. Size of the drawing room should be determined by type of furniture to be used.
Standard size of drawing room may range from: 4200mm (14ft) X 4800 mm (16ft) to 5400mm (18ft) X 7200mm (24ft)

2. Size of Bedrooms:

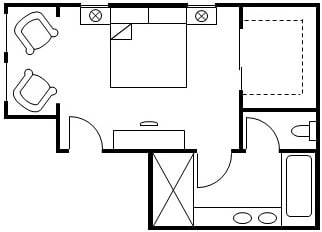
Bedrooms should be so located that they are well ventilated and at the same time provide privacy. Generally, they should be located on the sides of the building so that at least one wall is exposed for good ventilation and lighting.
The bedroom should be located on the side of the direction of prevailing wind. The location should be such that the bedroom receives sunlight during morning hours. The minimum window area should be 1:10th of the floor area. In bedrooms 9.5 cubic meter per adult and 5.5cubic meter per child space should be available and suitable allowance should be made for furniture.
Standard Size of Bedroom
If good water supply and drainage system is available, a bedroom should have an attached bathroom and water closet.
Standard size of bedrooms may range from:3000mm (10ft) X 3600mm (12ft) to 4200mm (14ft) X 4800mm (16ft)

3. Size of Guest Room:

Guest room should be well lighted and ventilated. It should be located on one side of the building, generally by the side of the drawing room.
Size of Guest Room
Guest should be disconnected from inside of the house and should have separated bathroom and water closet.
Standard size of guest rooms may be: 3000mm (10ft) X 3600mm (12ft)

4. Size of Verandah:

The best location for verandah is south and west. If the frontage of the building is east then they are located in east also. The verandah also serves the purpose of a waiting room. It segregates the private apartment from the entrance area.
The veranda should shade the walls of the building during greater part of the day. For this it is necessary that it must not have openings of a height greater than 2:3rd of the floor width.
Each house should have one front and rear verandah. If space doesn’t permit, the rear verandah can be omitted.
Verandah have width ranging from 1800mm (6ft) to 3000mm (10ft)
Verandah opening should always have a chajja projection for protection from sunlight and rain water.

5. Size of Office Room:

Office rooms should be on one side of front verandah, disconnected from other rooms. Sometimes an office room serves the purpose of guest room and vice versa.
Standard size of office room may be: 3000mm (10ft) X 3600mm (12ft)

6. Size of Dining Room:

Generally, the dining room should be provided in rear of the drawing or living room and near the kitchen. In modern houses drawing room and dining room are combined to have a big room for special occasions. For orthodox families dining room is kept separate.
Size of Dining Room
Size of bedrooms may range from: 3600mm (12ft) X 4200mm (14ft) to 4200mm (14ft)X4800mm (16ft)

7. Size of Kitchen:

The kitchen should be provided in rear corner of the building but NE corner is the best. It should be connected with dining room and should have one approach from outside also.
If possible, the kitchen should be so located that sun light should come in the morning hours, when it is used most.
It should have windows for good ventilation and chimney for smoke escape. The window space should be min. of 15% of floor area.
Sink should be provided for washing and sufficient number of shelves should also be provided. Sometimes storeroom and kitchen are combined together, if less space is available.
Standard size of kitchen rooms may range from: 2500mm (8ft) X 3900mm (13ft) to 3000mm (10ft) X 3600mm (12ft)

8. Store Room:

Store rooms should be located near the kitchen and should have sufficient number of racks.
Standard size of store room may range from: 2500mm (8ft) X 2500mm (8ft) to 3000mm (10ft) X 3000mm (10ft)

9. Pantry:

Pantry is a small room adjacent to dining room for keeping cooked food. It should have sufficient numbers of cup-boards and shelves. For ordinary building, kitchen serves the purpose of pantry.
Size of pantry may range from: 2500mm (8ft) X 3000mm (10ft)

10. Size of Bathroom and WC:

Now-a-days it has become common practice to provide attached bathroom and water closets with each bedroom. This is preferable only when good drainage and water supply is available.
It is not attached to the bedrooms, bath and WC should be provided in rear of the building separately so that the two can be used at a time. Good ventilation should be provided for bath and WC.
There should be two windows in a bathroom. One for ventilation at a height of 2000mm above outside ground level and another at usual low level with frosted glass shutters for admitting light and maintaining privacy.
Sometimes ceiling height is kept low (2100mm or 7ft) and upper space is used for storage purpose

Common sizes of bathroom and water closet may be:

Bath and WC (combined): 1800mm X 1800mm to 1800mm X 2500mm
Bathroom (separate): 1200mm X 1800mm
WC (separate): 1200mm X 1200mm