Concrete Driveway construction is gaining higher popularity over asphalt or bitumen or other paving materials. Concrete driveways also called as cement driveways offer a variety of decorative options which make these driveways unique from other methods of driveway construction.
Here, the construction and finishing requirements of concrete driveway construction are explained briefly.
Table of Contents
Concrete Driveway construction
The concrete driveway construction must be properly facilitated by the contractor in charge, in order to obtain the desired quality, finish and durability. The quality of workmanship and the materials used for the construction decides the performance and aesthetics of the concrete driveway.
A proper concrete driveway construction implements the following requirements.
- Proper Subgrade Preparation
- Selection of Proper Concrete Mix
- Placement of Reinforcement
- Concrete Placement
- Proper Finishing of Concrete Driveways
- Proper Placement of Joints
- Adequate Drainage Facility
- Adequate Curing
1. Proper Subgrade Preparation
The subgrade must be prepared to ensure uniformity in the soil composition as well as the compaction. Achieving this requirement helps to provide adequate support to the loads coming over the driveway.
This helps achieve:
- Even slab thickness
- Prevention of cracks in slabs
- Achieving uniform slab thickness
If during the preparation, soft spot areas are found, it is recommended to replace that soil with a good material like crushed rock or gravels. A geotechnical engineer must be approached in order to get a clear picture about soil properties of the site under consideration.
The process of compaction can be performed by rammers or vibratory compactors.
2. Selection of Proper Concrete Mix
ASTM C-94 recommends the use of ready-mix concrete for the construction of concrete driveways as they provide uniform concrete mix. Random cracking problems are avoided by the use of the correct concrete mix. Some of the requirements are:
- A 28th day concrete compressive strength of 4000psi is adequate for most climates.
- Air entrained concrete ( Air content of 5 to 10%) helps improves the durability and workability of concrete.
- A slump value not greater than 5 inches is not preferred.
- Aggregates used in concrete driveway construction mainly focus on coarse aggregates. Their size ranges from ¾ to 1.
- For driveway subjected to high traffic, high freezing and thawing conditions, chemical exposures; high-performance concrete is the best choice. It is bit costlier compared with normal mix design but it will compromise with the durability and less maintenance it guarantees.
3. Placement of Reinforcement
Most of the light-duty driveways make use of plain concrete. In order to increase the structural capacity of the driveway, concrete and reinforced concrete can be employed. A reinforced concrete driveway is the best choice in areas subjected to heavy traffic.
The provision of reinforcement does not prevent cracks. But the rebars holds the cracks together if they occur and prevents further propagation.
The reinforcement can be placed in concrete driveway either in the form of a wire mesh or in a grid pattern. In order to correctly locate the reinforcement at the center of the concrete driveway, blocks can be placed under the rebars for support.
Nowadays, the use of synthetic fibers as reinforcement are gaining popularity because they help prevent shrinkage cracks to a large extends. They are not used as structural reinforcement but used as secondary reinforcement along with main steel reinforcement.
4. Concrete Placement
The structural capacity of the concrete driveway is greatly influenced by the thickness implemented. The minimum thickness recommended for a concrete driveway is 4 inches. An increase from 4 to 5 inches increases the structural capacity by 50% which is decided based on the specifications and requirements of the driveway.

Fig.1.Concrete Placed Over a Prepared Subrage and Reinforcement Mesh
Additional thickness by 1 to 2 inches are provided at the edges of the concrete driveway. As the edges are mostly subjected to heavy loading.
5. Proper Finishing of Concrete Driveways
Special care must be taken in the finishing process of the concrete driveway as most of the work goes wrong due to overworking on the surface or due to the operations performed over bleeding water on the surface.
The following steps are followed in the finishing of concrete driveways:
- Uniform surface is achieved by striking off excess concrete with a screed,
- By means of a magnesium bullfoat or a wood, the concrete is floated. This helps to prevent the accumulation of bleeding water.
- If there is no plan to provide a smooth or decorative finish on the surface, it is advised to have a broom finish over the surface.
- Further finishing with steel trowel is unnecessary
- It would be good if the concrete surface is sealed at premature so that the bleeding water does not evaporate.
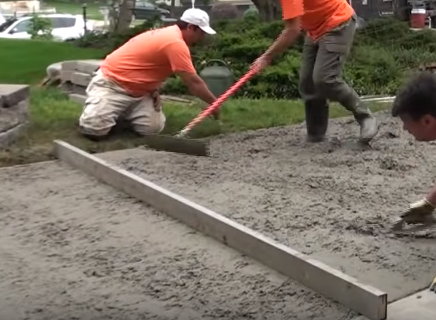
Fig.2.Finishing By Hand Floating Tool

Fig.3.Use of Bull Float to Smooth the Driveway

Fig.4.Final Finishing with Broom

Fig.5.Application of Sealants over the Concrete Driveways
6. Proper Placement of Joints
Provision of control joints at adequate spacing helps to avoid the issues of random cracking. The spacing mainly provided is 10 feet for a concrete driveway constructed at a thickness of 4 inches. The occurrence of random cracks is not a structural failure issue. But it affects the beauty of the driveway.

Fig.6.Cutting Control Joints
Random cracks can be prevented by avoiding joint patterns that have triangular or rectangular sections. The depth of the control joints must be 1/4th of the thickness of the driveway slab.
Wherever, the driveway meets sidewalk and other pavements or garage floor slabs; it is necessary to provide isolated joints. Always plan the joints before starting the driveway construction.
7. Adequate Drainage Facility
A proper drainage plan for concrete driveways helps to avoid standing water. Drainage for concrete driveways can be provided either by:
- Sloping the concrete driveways towards the streets. The side facing the existing structures must be at high altitude.
- If sloping is not possible, a drain must be installed at a low point of the concrete driveway. This water is then diverted away.
8. Adequate Curing
Most of the concrete driveway construction neglects the curing process. Curing is as important as all other steps mentioned above. Once the finishing is completed, the surface must be cured immediately. Curing can be performed by:
- Continuous Sprinkling
- Liquid Membranes
- Covering with Plastic sheets
- Covering with wet blankets
7-day curing is mostly recommended for concrete driveway construction. Negligence of the curing process reduces the strength by 50%.
Concrete driveway construction offers a number of advantages when compared with any form of traditional driveway construction methods. Out of all, the durability provided by the concrete driveway leads to further advantages.
Here, the advantages and some of the disadvantages reflected by concrete driveway construction are enlisted and briefly explained.
Advantages of Concrete Driveway Construction
Concrete being a material used in the construction of bridges, high-rise buildings, and structures, surely reflect its superior property when used as a driveway material. The major advantages of concrete driveway construction are:
- Quality Construction
- Durability
- Offers High Versatility
- Less Maintenance
- Costs
- Variety of Options
1. Quality Construction
Most of the driveway construction provides a first impression. The concrete as a driveway material adds the quality in appearance. It provides a clean and professional look.
2. Durability
A concrete driveway that is well made and well maintained can last for decades. Concrete being a superior structural material can take up heavy traffic loads, wear and tear and even other climatic exposures. The only requirement is the proper planned construction of concrete in the case of mix design and construction joints, depending on the conditions of the site. This guarantees long-term integrity.
3. Offers High Versatility
The concrete driveways are a perfect fit for any type of landscaping design, or building layout. It is apt for both residential and traffic use. The use of concrete driveway only enhances the beauty of the property. The versatility is maintained in terms of concrete driveway installation and the design variety it offers.
4. Less Maintenance
Concrete driveway owning the property of high durability itself reduces the maintenance required. Like other pavement options, the issue of weeds, paver shifting etc are not observed in concrete driveways. Concrete driveway demand little or zero maintenance.
If there comes any occurrence of stains over the concrete, there are solutions to easily remove it. The maximum maintenance that is required is to clean the surface once a year with the suitable stain cleaner which makes the surface perfect clean.
Concrete driveway construction also recommends the use of sealants to protect the surface from stains and other damages.
5. Costs
Here the cost is analysed in terms of construction cost and maintenance cost. The initial cost of concrete driveway construction is competitive but this is compromised with the zero-maintenance cost it offers. A good concrete driveway constructed can last for 20 to 25 years with zero maintenance which brings considerable cost saving over time. This is not the case with other driveway construction options.
6. Variety of Options
The concrete driveway construction provides a variety of options in design to start with. Either a slab look, or paver look (stamped concrete), or polished look (Polished concrete) can be brought based on the requirement. These options give an authentic appeal to the driveway.
Disadvantages of Concrete Driveway Construction
There are few disadvantages for concrete driveway construction:
- The implementation of polished or stamped concrete driveway construction is a bit costly compared with the normal concrete driveway construction. Special maintenance are required for these types for long term durability.
- Concrete pouring for driveway construction is best conducted by professionals and demand hard labour. This is not successful when performed as a DIY project.
- Annual Maintenance by application of sealants are recommended to ensure long life of the concrete driveway slabs.


