Wednesday, October 3, 2018


Consolidation Test on Soil by Consolidometer or Oedometer


Consolidation Test is used to determine the rate and magnitude of settlement in soils. The settlement values obtained by this test are due to primary consolidation only which is 90% of the total consolidation. The results of consolidation test are very much helpful in the design of foundations.

Apparatus Required for Consolidation Test

  1. Consolidometer or oedometer
    • Consolidation ring
    • Two porous stones
    • Two filter papers
    • Loading pad
  2. Dial gauge (accuracy of 0.002mm)
  3. Stop watch
  4. Knife or spatula or fine metal wires
  5. Weighing balance (accuracy of 0.01g)
  6. Vernier calipers
  7. Oven
  8. Water reservoir
Parts of Consolidometer
Fig 1: Parts of Consolidometer

Consolidation Test Procedure

Test procedure for consolidation test of soil contains following steps:
  1. First step is to collect the soil specimen using consolidation metal ring. The ring should be clean and dried and its weight, inner diameter and height are measured using weighing balance and calipers respectively.
  2. Now press the metal ring into the soil sample using hands and it is taken out with soil specimen.
  3. The soil specimen should project about 10 mm on either side of metal ring.
  4. Now trim the excess soil content on top and bottom of the rings using Knife or spatula or fine metal wires. This excess soil can be used to measure the water content of soil sample.
  5. Make sure that the ring should not contain any soil on its outer part and weight the metal ring with soil specimen.
  6. Take two porous stones and saturate them by boiling (15 minutes) or by submerging (4 to 8 hours) in distilled water.
  7. Assemble the consolidometer. Place the parts of consolidometer from bottom to top in the order beginning with bottom porous stone, filter paper, specimen ring, filter paper and top porous stone.
    Arrangement of Consolidometer Parts
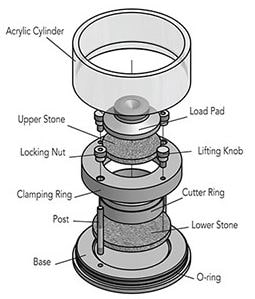
    Fig 2: Arrangement of Consolidometer Parts
  8. Place the loading pad on the top porous stone and lock the consolidometer using metal screws provided.
  9. Mount the whole assembly on the loading frame and center it such that the load applied is axial.
  10. Arrange the dial gauge in a position in such a way that it should allow sufficient space for swelling of soil specimen.
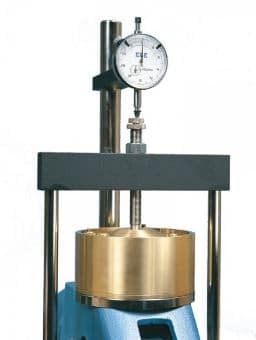
    Dial Gauge Position
    Fig 3: Dial Gauge Position
  11. Water reservoir is connected to the mounted assembly to saturate the soil. The water level in the water reservoir should be of same level as the soil specimen.
  12. Now apply the initial trail load which should not allow any swelling in the soil. In general 5 kN/m2 initial load applied for ordinary soils and 2.5 kN/mis applied for very soft soils.
  13. Leave the load until there is no change in dial gauge reading or for 24 hours and note down the final reading of dial gauge for initial load.
  14. First load increment of 10 kN/m2 is applied and start the stop watch immediately and note down the readings of dial gauge at various time intervals. In general, readings are taken at 0.25, 1, 2.5, 4, 6.25, 9, 16, 25, 30 minutes, 1, 2, 4, 8, 24 hrs.
  15. In general primary consolidation of soil (90% of consolidation) is reached within 24 hours. Hence readings are noted up to 24 hours.
    Loading Frame
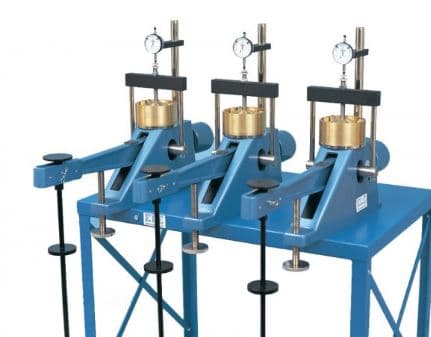
    Fig 4: Applying Loads on Consolidometers
  16. Next apply the second load increment of 20 kN/m2 and repeat same procedure as said in 14 th step.
  17. Similarly apply the load increments 50, 100, 200, 400 and 800 kN/m2 and repeat the same procedure and note down the readings.
  18. When values of last load increment are noted, now reduce the load to ¼ of the last load value and leave it for 24 hours. At this point note down the dial gauge reading. Reduce the load again and again and repeat the procedure until the load gets 10 kN/m2. At every point note down the final gauge readings.
  19. Now remove the assembly from loading frame and dismantle it.
  20. Take out the specimen ring and wipe out the excess water and Weigh the specimen ring and note down.
  21. Finally Put the specimen in oven and determine the dry weight of specimen.

Observations for Consolidation Test of Soil

Observation of consolidation test are
  • Height of ring =
  • Diameter of ring =
  • Area of ring =
  • Volume of ring =
  • Weight of ring =
  • Specific Gravity of Solids, G =
  • Weight of ring + soil specimen =
  • Initial water content =
  • Initial height of specimen, H =
  • Final Water Content =
  • Final weight of soil specimen =
Table 1: Dial gauge readings for different loads at different times
Intensity of load (kN/m2) Horizontal102050100200400800
Time Interval (vertical)
0 minutes
0.25 minutes
1.0 minutes
2.5 minutes
4 minutes
6.25 minutes
9 minutes
16 minutes
25 minutes
30 minutes
1 hour
2 hours
4 hours
8 hours
24 hours

Calculations for Consolidation Test of Soil

Height of solids,       Height of Solids
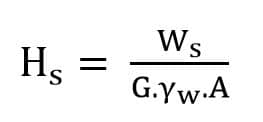
Height Voids,                     Hv = H – Hs
Void ratio,                           e = Hv/Hs
Table 2: Void ratio calculation for different pressure intensities
Intensity Pressure ( kN/m2)Initial Dial ReadingFinal Dial ReadingSpecimen height, HHeight of solids, HsHeight of voids, HvVoid Ratio, e
10
20
50
100
200
400
800

Graphs to be Plotted

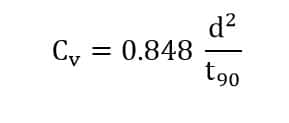
  • Dial gauge reading Vs. logarithmic of time – to determine the coefficient of consolidation (Cv).Coefficient of Consolidation
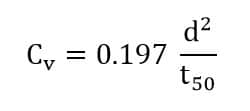
  • Dial gauge reading Vs. square root of time – to determine the coefficient of consolidation (Cv).Coefficient of Consolidation
Consolidation Test fo soil
Fig 5: Dial gauge Vs Time and Void Ratio Vs Effective Stress Graphs
  • Final void ratio Vs. Effective stress – to determine coefficient of compressibility (av) and coefficient of volume change (mv).Coefficient of compressibilityCoefficient of volume change
  • Final void ration Vs logarithmic of effective stress – To determine Compression Index (Cc).Compression Index
    Consolidation Test fo soil
    Fig 6: Void Ratio Vs logarithmic Effective Stress Graphs

Results of Consolidation Test of Soil

Consolidation Test of soils gives the following Results
  • Coefficient of compressibility (av) =
  • Coefficient of volume change (mv) =
  • Compression Index (Cc) =
  • Coefficient of consolidation (Cv) =

Polished Concrete Floors – Making Procedure and Benefits


Polished Concrete Floors – Making Procedure and Benefits


Polished concrete floor surface is made by a mechanical process of grinding and polishing with the help of a penetrant chemical to provide different texture. The polishing of concrete is a multi-step process which requires specialized tools and equipment.
The chemical penetrant employed for polishing is called as hardener. The construction process, features and the benefits of making polished concrete are explained below.

How to Make Polished Concrete?

The property of polished concrete is obtained through a surface effect. There are several ways to bring this surface effect of polished finished look. Whatever be the method chosen, the basic approach is the same.
Polished Concrete Floor
Fig.1.Polished Concrete Floor; Image Courtesy: Gardening Landscaping Ideas

1. Grinding Process

For polishing concrete surfaces, machines that are equipped with diamond segmented abrasives is employed. These machines help to grind down the concrete surfaces till the desired shine and smoothness is achieved.
Surface Preparation of Concrete for Polishing by Grinding
Fig.2. Surface Preparation of Concrete for Polishing by Grinding; Image Courtesy: Werk Master
As the grinding process proceeds, the coarser grit moves to finer-grits. Grits here is defined as the particle size of the diamond. Most of the concrete grinding process starts from a value less than 100. The machines available in the market have grinding discs with different grits.

2. Concrete Polishing Methods

The concrete can be polished by two methods, namely:
  1. Wet Method
  2. Dry Method

1. Wet Method of Polishing Concrete

In the wet method of polishing concrete, during the grinding process, water is used to cool the diamond abrasives. This hence reduces the amount of dust created during the polishing process. The water used in wet polishing method helps to reduce the friction. This water also acts as a lubricant, thus increasing the life of the polishing abrasives.
Wet Method of Polishing Concrete
Fig.3. Wet Method of Polishing Concrete; Image Courtesy: Runyon Surface Prep
As water is used throughout the process, a huge amount of slurry is formed. This creates difficulty in cleaning and disposal.

2. Dry Method of Polishing Concrete

In case of a dry polishing method, no water used during the process. To the floor polisher, a containment system is attached so that the dust formed is directly taken through this arrangement through vacuum effect. This clears the mess along with the process. This is an added advantage over wet polishing method.
The dry method is used commonly in industrial floor polishing as it is more convenient, fast and environmentally friendly.

Procedure to Polish Concrete

The step by step procedure to obtain a polished concrete are:
  1. The first step is to prepare the concrete surface by grinding. The concrete surface to be polished is prepared by removing the existing coatings over it. This can be performed by using a diamond abrasive of 16 to 20 grit. This must be the tool that is specifically used to remove coatings.
  2. If cracks or joints are present on the concrete surface, it must be sealed by means of fillers (semi-grid) or epoxies.
  3. Once sealed, the surface is grind with the diamond abrasives. The grit used can range from 30 to 40. A metal bonded diamond is used. This is followed by a metal bonded diamond grinding of 80 grit. Then with a 150 grit metal bonded diamond.
  4. After the series of grinding, the surface is densified by applying a chemical hardener.
  5. Polishing is performed by means of a resin bond diamond with grit varying from 100 to 200. A combination of both can also be used.
  6. Next polishing is performed by a 400 grit followed by an 800 grit resin bond diamond.
  7. The final finishing is performed by a 1500 or a 3000 grit resin-bond diamond.
  8. In order to maintain the surface, a coat of stain guard over the concrete surface is recommended.
Note: The different levels of grit values chosen depends on the smoothness and polish required by the manufacturer or the owner for the concrete surface.

Benefits of Polished Concrete

  1. High durability
  2. Creates non-slippery surface as it has a high coefficient of friction
  3. Low maintenance
  4. Insect attack and mold growth are not encouraged
  5. Helps improve natural lighting
  6. Use the existing materials for construction, hence are sustainable
  7. Polished concrete can be easily cleaned by water or neutral cleaners
  8. Polished concrete can withstand extreme industrial environments
  9. The concrete surface is improved by polishing
  10. The appearance of the concrete surface is improved
  11. 3D forms can be easily achieved by concrete polishing compared with natural stone.

Monday, October 1, 2018

Rate Analysis of Plastering with Cement Mortar -Material Quantity Calculation


Rate Analysis of Plastering with Cement Mortar -Material Quantity Calculation

Rate analysis of plastering with cement mortar requires the quantity estimation of materials cement mortar, i.e. quantity of cement, sand and water for various grades of mortar required. Grades of mortar used for plastering is generally same grade as used in the masonry work.
There are different grades of mortar that can be used for plastering of masonry structural members such as in CM 1:2, 1:4, 1:6, 1:8 etc. Cement Mortar in ratio 1:6 is generally used for plastering work.
For the calculation of quantity of cement and sand in mortar, volume of mortar required for plastering is calculated based on thickness of plastering surface and surface area of the structural member.
Let us take an example of a wall to be plastered:
Length of wall = 2m
Width of wall = 1.5m
Thickness of plaster to be used = 20mm
Plaster to be carried out in two layers of 10mm each.
The quantity of cement mortar required will be: 2 x 1.5 x (20/1000) = 0.06 m3 of mortar.
The rate analysis of mortar need to be done for the calculated quantity required. Read here the rate analysis of cement mortar to know how to calculate quantity of cement and sand in mortar.
Once the quantity of cement and sand is calculated, the labor cost required for mixing of mortar is calculated. The coefficients of labor for plastering work are taken from the Rate Analysis by CPWD.
The cost of mixing of calculated quantity of mortar remains constant, but the cost of application of mortar varies with number of layers in which the mortar is applied. Thus, the cost of mason depends on area to be plastered and number of layers of plaster to be applied. The cost of other labors varies with the quantity of cement mortar to be mixed and number of layers of plasters to be applied.
The coefficients of mason and labors are as follows per m2 area per layer of plaster to be applied:
Mason – 0.07435 days
Labors – 0.0929 days
Bhishti – 0.0929 days (the one who carries materials and water for mixing)
These coefficients are multiplied with the given quantity of cement mortar required for plaster in m3 and number of layers or plasters.
The number of days of mason required = 0.07435 x No. of layers x surface area
= 0.07435 x 2 x (2 x1.5) = 0.44610 days
For Labors and Bhishti = 0.0929 x 2 x (2 x 1.5) = 0.5574 days for each.
The labor and bhishti days required for mixing of cement mortar is also calculated as given in rate analysis of cement mortar.
For example, labor required = 0.21 x 0.06 = 0.0126 days
Bhishti required = 0.0929 x 0.06 = 0.005574 days.
Thus total number of days for plastering in two-layers of plaster for 1.5mx2mx20mm plaster:
Mason = 0.44610 days
Labor = 0.5574 + 0.0126 = 0.57 days
Bhishti = 0.5574 + 0.005574 = 0.562974 days.
The daily wages of masons and labors are multiplied with number of days required by them to get the cost.
The excel calculation for rate analysis of plastering is shown below: