Friday, June 8, 2018

Standard Size of Rooms in Residential Building and their Locations


Knowledge of standard size of rooms and their location in a residential building is important for planning of residential construction project. The room sizes and their location provides spaces for movement, sunlight and natural air for residents.

Standard Size of Rooms in Residential Building and their Locations

1. Size of Drawing or Living Room:

Drawing room or living room is a common, comfortable and attractive place for sitting of family members and to receive friends and guests. Sometime it is used as reception room and dining room and special occasions.
Drawing room should be located in the middle of the building and should be connected to the front verandah and dining place. It should be well-lighted and ventilated.
Standard Size of Rooms in Residential Building
Generally, drawing or living room is the biggest room of the building so that it can be utilized for some ceremonial function in the house. Size of the drawing room should be determined by type of furniture to be used.
Standard size of drawing room may range from: 4200mm (14ft) X 4800 mm (16ft) to 5400mm (18ft) X 7200mm (24ft)

2. Size of Bedrooms:

Bedrooms should be so located that they are well ventilated and at the same time provide privacy. Generally, they should be located on the sides of the building so that at least one wall is exposed for good ventilation and lighting.
The bedroom should be located on the side of the direction of prevailing wind. The location should be such that the bedroom receives sunlight during morning hours. The minimum window area should be 1:10th of the floor area. In bedrooms 9.5 cubic meter per adult and 5.5cubic meter per child space should be available and suitable allowance should be made for furniture.
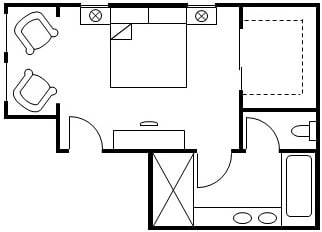
Standard Size of Bedroom
If good water supply and drainage system is available, a bedroom should have an attached bathroom and water closet.
Standard size of bedrooms may range from:3000mm (10ft) X 3600mm (12ft) to 4200mm (14ft) X 4800mm (16ft)

3. Size of Guest Room:

Guest room should be well lighted and ventilated. It should be located on one side of the building, generally by the side of the drawing room.
Size of Guest Room
Guest should be disconnected from inside of the house and should have separated bathroom and water closet.
Standard size of guest rooms may be: 3000mm (10ft) X 3600mm (12ft)

4. Size of Verandah:

The best location for verandah is south and west. If the frontage of the building is east then they are located in east also. The verandah also serves the purpose of a waiting room. It segregates the private apartment from the entrance area.
The veranda should shade the walls of the building during greater part of the day. For this it is necessary that it must not have openings of a height greater than 2:3rd of the floor width.
Each house should have one front and rear verandah. If space doesn’t permit, the rear verandah can be omitted.
Verandah have width ranging from 1800mm (6ft) to 3000mm (10ft)
Verandah opening should always have a chajja projection for protection from sunlight and rain water.

5. Size of Office Room:

Office rooms should be on one side of front verandah, disconnected from other rooms. Sometimes an office room serves the purpose of guest room and vice versa.
Standard size of office room may be: 3000mm (10ft) X 3600mm (12ft)

6. Size of Dining Room:

Generally, the dining room should be provided in rear of the drawing or living room and near the kitchen. In modern houses drawing room and dining room are combined to have a big room for special occasions. For orthodox families dining room is kept separate.
Size of Dining Room
Size of bedrooms may range from: 3600mm (12ft) X 4200mm (14ft) to 4200mm (14ft)X4800mm (16ft)

7. Size of Kitchen:

The kitchen should be provided in rear corner of the building but NE corner is the best. It should be connected with dining room and should have one approach from outside also.
If possible, the kitchen should be so located that sun light should come in the morning hours, when it is used most.
It should have windows for good ventilation and chimney for smoke escape. The window space should be min. of 15% of floor area.
Sink should be provided for washing and sufficient number of shelves should also be provided. Sometimes storeroom and kitchen are combined together, if less space is available.
Standard size of kitchen rooms may range from: 2500mm (8ft) X 3900mm (13ft) to 3000mm (10ft) X 3600mm (12ft)

8. Store Room:

Store rooms should be located near the kitchen and should have sufficient number of racks.
Standard size of store room may range from: 2500mm (8ft) X 2500mm (8ft) to 3000mm (10ft) X 3000mm (10ft)

9. Pantry:

Pantry is a small room adjacent to dining room for keeping cooked food. It should have sufficient numbers of cup-boards and shelves. For ordinary building, kitchen serves the purpose of pantry.
Size of pantry may range from: 2500mm (8ft) X 3000mm (10ft)

10. Size of Bathroom and WC:

Now-a-days it has become common practice to provide attached bathroom and water closets with each bedroom. This is preferable only when good drainage and water supply is available.
It is not attached to the bedrooms, bath and WC should be provided in rear of the building separately so that the two can be used at a time. Good ventilation should be provided for bath and WC.
There should be two windows in a bathroom. One for ventilation at a height of 2000mm above outside ground level and another at usual low level with frosted glass shutters for admitting light and maintaining privacy.
Sometimes ceiling height is kept low (2100mm or 7ft) and upper space is used for storage purpose

Common sizes of bathroom and water closet may be:

Bath and WC (combined): 1800mm X 1800mm to 1800mm X 2500mm
Bathroom (separate): 1200mm X 1800mm
WC (separate): 1200mm X 1200mm
Economical Design of Reinforced Concrete Columns to Reduce Cost


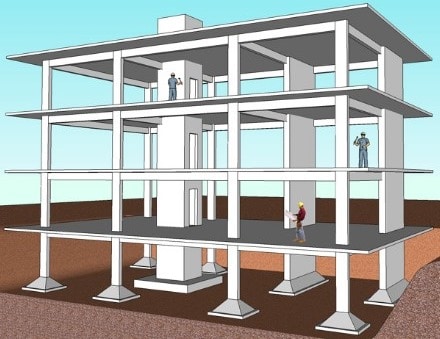
Economical design of reinforced concrete columns and its construction practices and recommendations to reduce its cost of construction is discussed. Columns are the major elements in reinforced concrete structures and the safety and stability of the structure greatly depends on it.
The cost of a column per linear meter per MPa of load carrying capacity substantially varies due to several factors, for example, the location of the column in the structure (exterior column and interior column) and the configuration of the loads imposed on the column and others.
However, there are number of recommendations and measure by which a cost effective reinforced concrete column can be designed and constructed. These recommendations will be discussed in the following sections.
Reinforced Concrete Column Construction
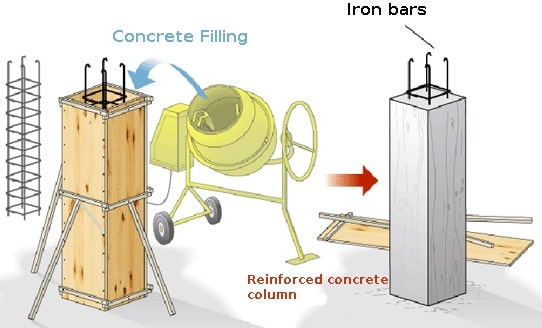
Fig.1: Reinforced Concrete Column Construction

Recommendations for Economical Design of Reinforced Concrete Columns

Recommendation provided for economical design of reinforced concrete columns are as follow:
  • Strength of concrete employed for reinforced concrete column
  • Formwork used for casting reinforced concrete column
  • Steel reinforcements used in the reinforced concrete column construction
  • Details of reinforcement of concrete column

Strength of Concrete for Reinforced Concrete Column

A valuable recommendation provided regarding concrete strength is the use of maximum concrete compressive strength needed to carry factored loads and lowest permissible reinforcement ratio. This is because the lowest price would be reached if such measure is practiced as the cost of reinforcement reduces.
It is claimed that, the use of minimum reinforcement ratio for a given column would reduce total column cost significantly (around 32% for concrete strength of 56MPa and 57% for concrete strength of 100MPa) compared with the case where maximum reinforcement ratio is utilized.
The smallest size of columns in multi storey structures is specified based on the maximum concrete compressive strength and a limit on the maximum reinforcement ratio.
If the size of column is smaller than the minimum allowable size at the base of the structure, then reinforcement ratio can be decreased.
Finally, both reinforcement ratio and concrete compressive strength can be decreased as the imposed factored loads decline in the upper storeys.
Economical Design of Reinforced Concrete Columns
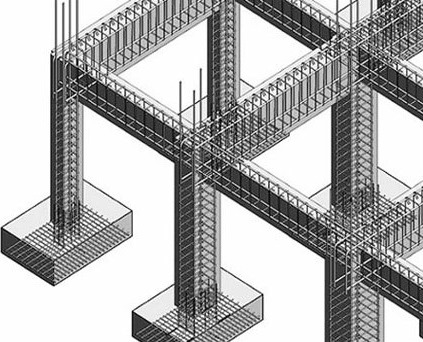
Fig.2: Dimension and Reinforcements of Columns

Formwork Used for Casting Reinforced Concrete Column

It is recommended to use the same size and shape for reinforced concrete column for the all floors and from footing to the roof.
Not only does this strategy would allow to construction large number of columns (mass production) but also the formwork of columns can be reused again.
One may argue that, using the same size for all columns would lead to utilize large quantity of additional concrete and hence it would be uneconomical.
However, it is proven that, savings achieved from formwork cost and fast construction would be much greater than the cost of extra material used for smaller columns of storeys above. Added to that, this strategy is claimed to be applicable for maximum building height of 188.2m
column-formwork
Fig.3: Column Formwork
Formwork Used for Casting Reinforced Concrete Column
Fig.4: The Same Size and Shape of Column used in the Construction of Multi Storey Building

Steel Reinforcements used in the Reinforced Concrete Column Construction

It is advised to conduct cost comparison between various combination of concrete compressive strength and steel yield strength to specify combination that provides lowest cost.
It is reported that, the use of high strength concrete with 520MPa yield strength would need lowest cost.
Another measure to decrease cost of reinforcements is to utilize minimum tie bars without the violation of code specifications.
Minimum tie requirement would be reached if a longitudinal steel bar is installed at each corner of the column.
If minimum tie requirement is realized, then it would not be necessary to use interior ties.
Consequently, not only can low slump concrete be poured and properly compacted but also the time and cost required to install column reinforcement would be reduced.

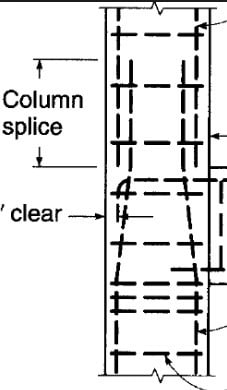
Detailing of Reinforcement of Concrete Column

It is possible to make savings in splices subjected to compression only (in another word, end bearing mechanical splices). Added to that, it is advised to employ staggering in order to make the mechanical end bearing to resist certain amount of bending.
Compression Only Mechanical Splices
Fig.5: Compression Only Mechanical Splices
Commonly, tensile splice of steel bar with 32mm size is required to be employed if the column subjected to large bending force. In this case, it is recommended to use mechanical splice because it is more economical.
However, if the size of the bar is smaller than 32mm, then it is more economical to consider lap splice rather than mechanical splice.
Detailing of Reinforcement of Concrete Column
Fig.6: Lap Splice in Column


What is No-Fines Concrete? Advantages and Mix Proportion


What is No-Fines Concrete?

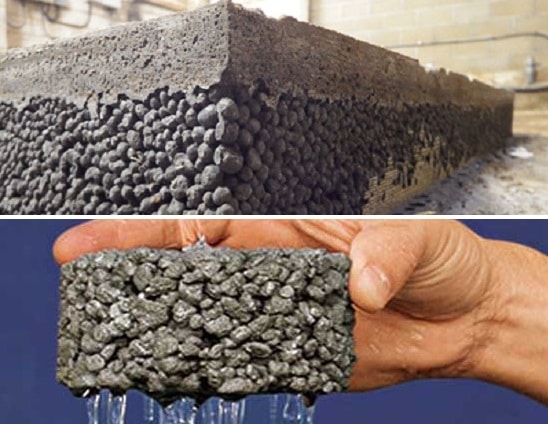
No-Fines Concrete is a lightweight concrete made up of only coarse aggregate, cement and water by omitting fines (sand or fine aggregates) from normal concrete. Advantages, limitations and mix proportions of no-fines concrete is discussed.
Very often only single sized coarse aggregate, of size passing through 20 mm retained on 10mm is used. No-fines concrete is becoming popular because of some of the advantages it possesses over the conventional concrete.
The single sized aggregates make a good no-fines concrete, which in addition to having large voids and hence light in weight, also offers architecturally attractive look.

Advantages of No-Fines Concrete

  1. No fines concrete is a lightweight concrete i.e. density is about 25 to 30% less than the normal concrete due to no fine aggregates, thus self-weight of structure is less.
  2. As it does not have sands or fine aggregates, it has less drying shrinkage compared to normal concrete
  3. It has better thermal insulating characteristic than normal concrete and thus it is useful for construction of external wall.
  4. As it has no fine aggregates, the surface area required for cement coating is reduced considerably. So, quantity of cement required gets reduced per cubic meter compared with normal concrete. So, it is economical.
  5. Lightweight concrete has no effect on quality due to segregation of coarse aggregates as it has no fine aggregates. Thus, it can be dropped from heights.
  6. No fines concrete can be compacted without the need of any types of concrete vibrators and can be easily done by tamping with rods.

Limitations of No Fines Concrete

  1. As there is no fine aggregates to fill the voids in this concrete, it has high permeability than normal concrete. Thus, it is not a good idea to construct reinforced concrete with no fines concrete, as the reinforcement can easily get corroded.
  2. To make this concrete impermeable, extra coat of masonry plaster is required, which increase the cost.
  3. No fines concrete can not be tested for workability by using tests for normal concrete such as slump or compaction factor test. Values of workability and its test methods are unknown.

Mix-proportion of No-Fines Concrete

No-fines concrete is generally made with the aggregate/cement ratio from 6 : 1 to 10 :1. Aggregates used are normally of size passing through 20 mm and retained on 10 mm.
Unlike the conventional concrete, in which strength is primarily controlled by the water/cement ratio, the strength of no-fines concrete is dependent on the water/cement ratio, aggregate cement ratio and unit weight of concrete.
The water/cement ratio for satisfactory consistency will vary between a narrow range of 0.38 and 0.52. Water/cement ratio must be chosen with care. If too low a water/cement ratio is adopted, the paste will be so dry that aggregates do not get properly smeared with paste which results in insufficient adhesion between the particles.
On the other hand, if the water/cement ratio is too high, the paste flows to the bottom of the concrete, particularly when vibrated and fills up the voids between the aggregates at the bottom and makes that portion dense. This condition also reduces the adhesion between aggregate and aggregate owing to the paste becoming very thin.
No standard method is available, like slump test or compacting factor test for measuring the consistency of no-fines concrete. Perhaps a good, experienced visual examination and trial and error method may be the best guide for deciding optimum water/cement ratio.
No-fines concrete, when conventional aggregates are used, may show a density of about 1600 to 1900 kg/m3, but when no-fines concrete is made by using lightweight aggregate, the density may come to about 360 kg/m3.
No-fines concrete does not pose any serious problem for compaction. Use of mechanical compaction or vibratory methods are not required. Simple rodding is sufficient for full compaction.
No-fines concrete does not give much side thrust to the formwork as the particles are having point to point contact and concrete does not flow. Therefore, the side of the formworks can be removed in a time interval shorter than for conventional concrete.
However, formwork may be required to be kept for a longer time, when used as a structural member, as the strength of concrete is comparatively less. The compressive strength of no-fines concrete varies between 1.4 MPa to about 14 MPa. Table 12.5 shows the compressive strength of no-fines concrete.
The bond strength of no-fines concrete is very low and, therefore, reinforcement is not used in conjunction with no-fines concrete. However, if reinforcement is required to be used in no-fines concrete, it is advisable to smear the reinforcement with cement paste to improve the bond and also to protect it from rusting.

Types of Scaffolding used in Construction


What is the scaffolding?

Scaffolding is a temporary structure to support the original structure as well as workmen used it as a platform to carry on the construction works. Types of scaffolding varies with the type of construction work. Scaffolding is made up of timber or steel. It should be stable and strong to support workmen and other construction material placed on it.

Types of Scaffolding used in Construction:

Following are types of Scaffolding in construction:
  1. Single scaffolding
  2. Double scaffolding
  3. Cantilever scaffolding
  4. Suspended scaffolding
  5. Trestle scaffolding
  6. Steel scaffolding
  7. Patented scaffolding

1. Single Scaffolding

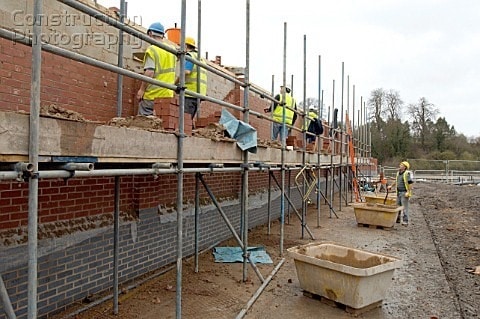
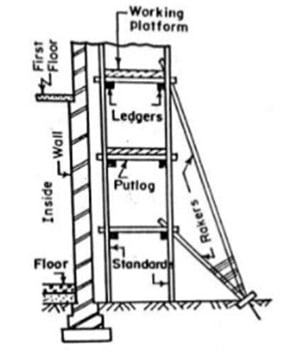
Single scaffolding is generally used for brick masonry and is also called as brick layer’s scaffolding. Single scaffolding consists of standards, ledgers, putlogs etc., which is parallel to the wall at a distance of about 1.2 m. Distance between the standards is about 2 to 2.5 m. Ledgers connect the standards at vertical interval of 1.2 to 1.5 m. Putlogs are taken out from the hole left in the wall to one end of the ledgers. Putlogs are placed at an interval of 1.2 to 1.5 m.
Single Scaffolding in Construction

2. Double Scaffolding

Double Scaffolding is generally used for stone masonry so, it is also called as mason’s scaffolding. In stone walls, it is hard to make holes in the wall to support putlogs. So, two rows of scaffolding is constructed to make it strong. The first row is 20 – 30 cm away from the wall and the other one is 1m away from the first row. Then putlogs are placed which are supported by the both frames. To make it more strong rakers and cross braces are provided. This is also called as independent scaffolding.
Types of Scaffolding - Double Scaffolding

3. Cantilever Scaffolding

This a type of scaffolding in which the standards are supported on series of needles and these needles are taken out through holes in the wall. This is called single frame type scaffolding. In the other type needles are strutted inside the floors through the openings and this is called independent or double frame type scaffolding. Care should be taken while construction of cantilever scaffolding.
Generally cantilever scaffoldings are used under conditions such as
  • When the ground does not having the capacity to support standards,
  • When the Ground near the wall is to be free from traffic,
  • When upper part of the wall is under construction.
Types of Scaffolding - Cantilever Scaffolding

4. Suspended Scaffolding

In suspended scaffolding, the working platform is suspended from roofs with the help of wire ropes or chains etc., it can be raised or lowered to our required level. This type of scaffolding is used for repair works, pointing, paintings etc..
Suspended Scaffolding

5. Trestle Scaffolding

In Trestle scaffolding, the working platform is supported on movable tripods or ladders. This is generally used for work inside the room, such as paintings, repairs etc., up to a height of 5m.
Trestle Scaffolding

6. Steel Scaffolding

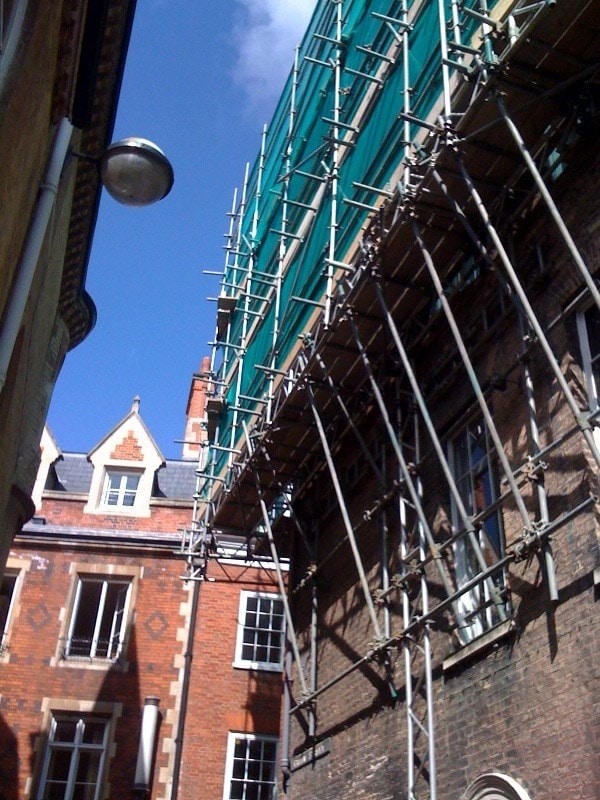
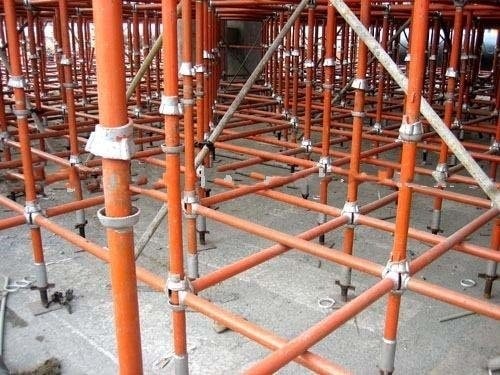
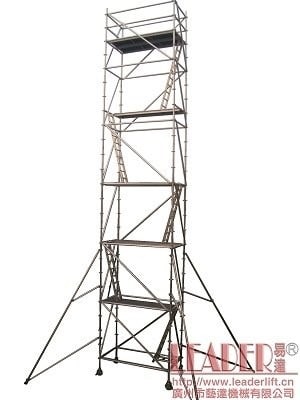
Steel scaffolding is constructed by steel tubes which are fixed together by steel couplers or fittings. It is very easy to construct or dismantle. It has greater strength, greater durability and higher fire resistance. It is not economical but will give more safety for workers. So, it is used extensively nowadays.
Steel Scaffolding

7. Patented Scaffolding

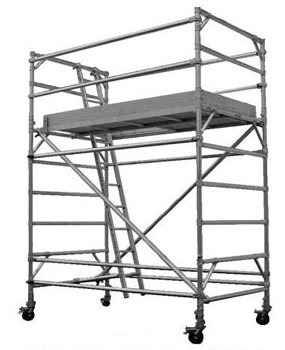
Patented scaffoldings are made up of steel but these are equipped with special couplings and frames etc., these are readymade scaffoldings which are available in the market. In this type of scaffolding working platform is arranged on brackets which can be adjustable to our required level.
Patented Scaffolding